3. Building the World
Creating Segments
For this world to be infinite, the best way to approach this is to create segments that can be reloaded over and over. To do this, we need a rough sketch of what our level segments will look like. I have created the following sketch to show what the segments would look like and how they can be repeated:
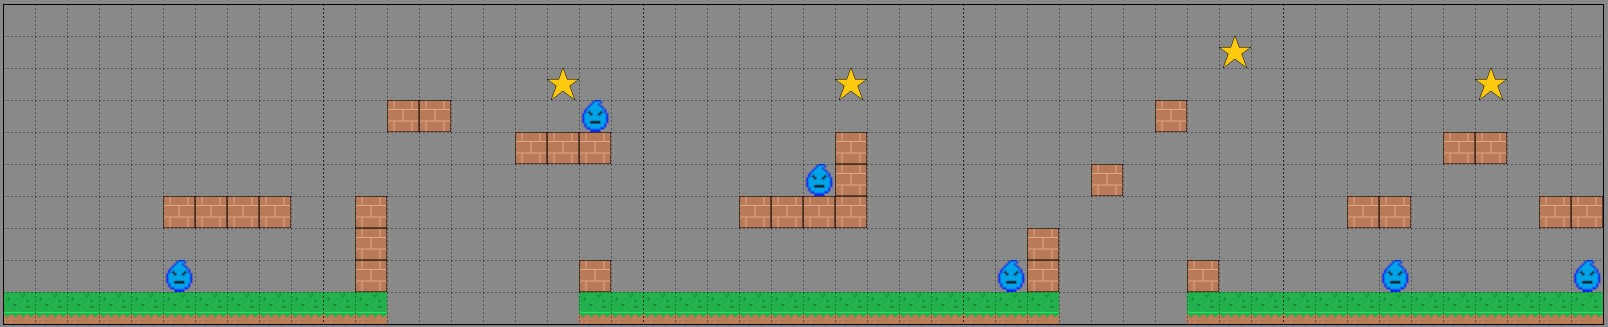
Each segment is a 10x10 grid and each block is 64 pixels x 64 pixels. This means Ember Quest has a height of 640 with an infinite width. In my design, there must always be a ground block at the beginning and the end. Additionally, there must be at least 3 ground blocks that come before an enemy, including if the segment wraps to another segment. This is because the plan is to have the enemies traverse back and forth for 3 blocks. Now that we have a plan for the segments, let’s create a segment manager class.
Segment Manager
To get started, we have to understand that we will be referencing our blocks in the segment manager,
so first create a new folder called lib/objects. In that folder, create 3 files called
ground_block.dart, platform_block.dart, and star.dart. Those files just need basic
boilerplate code for the class, so create the following in their respective files:
class GroundBlock{}

class PlatformBlock{}

class Star{}
Also, create water_enemy.dart in the lib/actors folder using this boilerplate code:
class WaterEnemy{}
Now we can create a file called segment_manager.dart which will be placed in a new folder called
lib/managers. The segment manager is the heart and soul, if you will, of Ember Quest. This is
where you can get as creative as you want. You do not have to follow my design, just remember that
whatever you design, the segment must follow the rules outlined above. Add the following code to
segment_manager.dart:
class Block {
  // gridPosition position is always segment based X,Y.
  // 0,0 is the bottom left corner.
  // 10,10 is the upper right corner.
  final Vector2 gridPosition;
  final Type blockType;
  Block(this.gridPosition, this.blockType);
}

final segments = [
  segment0,
];

final segment0 = [

];
So what this does, is allows us to create segments (segment0, segment1, etc) in a list format that
gets added to the segments list. The individual segments will be made up of multiple entries of the
Block class. This information will allow us to translate the block position from a 10x10 grid to
the actual pixel position in the game world. To create a segment, you need to create
entries for each block that you wish to be rendered from the sketch.
To understand each segment, if we start in the bottom left corner of the grid in the sketch, we see
that we should place a Block() in the segment0 list with a first parameter gridPosition of a
Vector2(0,0) and a blockType of the GroundBlock class that we created earlier. Remember, the
very bottom left cell is x=0 and y=0 thus the Vector2(x,y) is Vector2(0,0).
The full segment would look like this:
final segment0 = [
  Block(Vector2(0, 0), GroundBlock),
  Block(Vector2(1, 0), GroundBlock),
  Block(Vector2(2, 0), GroundBlock),
  Block(Vector2(3, 0), GroundBlock),
  Block(Vector2(4, 0), GroundBlock),
  Block(Vector2(5, 0), GroundBlock),
  Block(Vector2(5, 1), WaterEnemy),
  Block(Vector2(5, 3), PlatformBlock),
  Block(Vector2(6, 0), GroundBlock),
  Block(Vector2(6, 3), PlatformBlock),
  Block(Vector2(7, 0), GroundBlock),
  Block(Vector2(7, 3), PlatformBlock),
  Block(Vector2(8, 0), GroundBlock),
  Block(Vector2(8, 3), PlatformBlock),
  Block(Vector2(9, 0), GroundBlock),
];
Proceed to build the remaining segments. The full segment manager should look like this:
import 'package:flame/components.dart';

import '../actors/water_enemy.dart';
import '../objects/ground_block.dart';
import '../objects/platform_block.dart';
import '../objects/star.dart';

class Block {
  // gridPosition position is always segment based X,Y.
  // 0,0 is the bottom left corner.
  // 10,10 is the upper right corner.
  final Vector2 gridPosition;
  final Type blockType;
  Block(this.gridPosition, this.blockType);
}

final segments = [
  segment0,
  segment1,
  segment2,
  segment3,
  segment4,
];

final segment0 = [
  Block(Vector2(0, 0), GroundBlock),
  Block(Vector2(1, 0), GroundBlock),
  Block(Vector2(2, 0), GroundBlock),
  Block(Vector2(3, 0), GroundBlock),
  Block(Vector2(4, 0), GroundBlock),
  Block(Vector2(5, 0), GroundBlock),
  Block(Vector2(5, 1), WaterEnemy),
  Block(Vector2(5, 3), PlatformBlock),
  Block(Vector2(6, 0), GroundBlock),
  Block(Vector2(6, 3), PlatformBlock),
  Block(Vector2(7, 0), GroundBlock),
  Block(Vector2(7, 3), PlatformBlock),
  Block(Vector2(8, 0), GroundBlock),
  Block(Vector2(8, 3), PlatformBlock),
  Block(Vector2(9, 0), GroundBlock),
];

final segment1 = [
  Block(Vector2(0, 0), GroundBlock),
  Block(Vector2(1, 0), GroundBlock),
  Block(Vector2(1, 1), PlatformBlock),
  Block(Vector2(1, 2), PlatformBlock),
  Block(Vector2(1, 3), PlatformBlock),
  Block(Vector2(2, 6), PlatformBlock),
  Block(Vector2(3, 6), PlatformBlock),
  Block(Vector2(6, 5), PlatformBlock),
  Block(Vector2(7, 5), PlatformBlock),
  Block(Vector2(7, 7), Star),
  Block(Vector2(8, 0), GroundBlock),
  Block(Vector2(8, 1), PlatformBlock),
  Block(Vector2(8, 5), PlatformBlock),
  Block(Vector2(8, 6), WaterEnemy),
  Block(Vector2(9, 0), GroundBlock),
];

final segment2 = [
  Block(Vector2(0, 0), GroundBlock),
  Block(Vector2(1, 0), GroundBlock),
  Block(Vector2(2, 0), GroundBlock),
  Block(Vector2(3, 0), GroundBlock),
  Block(Vector2(3, 3), PlatformBlock),
  Block(Vector2(4, 0), GroundBlock),
  Block(Vector2(4, 3), PlatformBlock),
  Block(Vector2(5, 0), GroundBlock),
  Block(Vector2(5, 3), PlatformBlock),
  Block(Vector2(5, 4), WaterEnemy),
  Block(Vector2(6, 0), GroundBlock),
  Block(Vector2(6, 3), PlatformBlock),
  Block(Vector2(6, 4), PlatformBlock),
  Block(Vector2(6, 5), PlatformBlock),
  Block(Vector2(6, 7), Star),
  Block(Vector2(7, 0), GroundBlock),
  Block(Vector2(8, 0), GroundBlock),
  Block(Vector2(9, 0), GroundBlock),
];

final segment3 = [
  Block(Vector2(0, 0), GroundBlock),
  Block(Vector2(1, 0), GroundBlock),
  Block(Vector2(1, 1), WaterEnemy),
  Block(Vector2(2, 0), GroundBlock),
  Block(Vector2(2, 1), PlatformBlock),
  Block(Vector2(2, 2), PlatformBlock),
  Block(Vector2(4, 4), PlatformBlock),
  Block(Vector2(6, 6), PlatformBlock),
  Block(Vector2(7, 0), GroundBlock),
  Block(Vector2(7, 1), PlatformBlock),
  Block(Vector2(8, 0), GroundBlock),
  Block(Vector2(8, 8), Star),
  Block(Vector2(9, 0), GroundBlock),
];

final segment4 = [
  Block(Vector2(0, 0), GroundBlock),
  Block(Vector2(1, 0), GroundBlock),
  Block(Vector2(2, 0), GroundBlock),
  Block(Vector2(2, 3), PlatformBlock),
  Block(Vector2(3, 0), GroundBlock),
  Block(Vector2(3, 1), WaterEnemy),
  Block(Vector2(3, 3), PlatformBlock),
  Block(Vector2(4, 0), GroundBlock),
  Block(Vector2(5, 0), GroundBlock),
  Block(Vector2(5, 5), PlatformBlock),
  Block(Vector2(6, 0), GroundBlock),
  Block(Vector2(6, 5), PlatformBlock),
  Block(Vector2(6, 7), Star),
  Block(Vector2(7, 0), GroundBlock),
  Block(Vector2(8, 0), GroundBlock),
  Block(Vector2(8, 3), PlatformBlock),
  Block(Vector2(9, 0), GroundBlock),
  Block(Vector2(9, 1), WaterEnemy),
  Block(Vector2(9, 3), PlatformBlock),
];
Loading the Segments into the World
Now that our segments are defined, we need to create a way to load these blocks into our world. To
do that, we are going to start work in the ember_quest.dart file. We will create a loadSegments
method that when given an index for the segments list, will then loop through that segment from
our segment_manager and we will add the appropriate blocks later. It should look like this:
void loadGameSegments(int segmentIndex, double xPositionOffset) {
    for (final block in segments[segmentIndex]) {
      switch (block.blockType) {
        case GroundBlock:
          break;
        case PlatformBlock:
          break;
        case Star:
          break;
        case WaterEnemy:
          break;
      }
    }
  }
You will need to add the following imports if they were not auto-imported:
import 'actors/water_enemy.dart';
import 'managers/segment_manager.dart';
import 'objects/ground_block.dart';
import 'objects/platform_block.dart';
import 'objects/star.dart';
Now we can refactor our game a bit and create an initializeGame() method which will call our
loadGameSegments method.
  void initializeGame() {
    // Assume that size.x < 3200
    final segmentsToLoad = (size.x / 640).ceil();
    segmentsToLoad.clamp(0, segments.length);

    for (var i = 0; i <= segmentsToLoad; i++) {
      loadGameSegments(i, (640 * i).toDouble());
    }

    _ember = EmberPlayer(
      position: Vector2(128, canvasSize.y - 70),
    );
    add(_ember);
  }
We simply are taking the width of the game screen, divide that by 640 (10 blocks in a segment times
64 pixels wide for each block), and round that up. As we only defined 5 segments total, we need to
restrict that integer from 0 to the length of the segments list in case the user has a really wide
screen. Then we simply loop through the number of segmentsToLoad and call loadGameSegments with
the integer to load and then calculate the offset.
Additionally, I have moved the Ember-related code from the onLoad method to our new
initializeGame method. This means I can now make the call in onLoad to initializeGame such
as:
@override
  Future<void> onLoad() async {
    await images.loadAll([
      'block.png',
      'ember.png',
      'ground.png',
      'heart_half.png',
      'heart.png',
      'star.png',
      'water_enemy.png',
    ]);
    initializeGame();
  }
At this point, you probably have errors for all the object classes and the enemy class, but don’t worry, we will solve those right now.
The Platform Block
One of the easiest blocks to start with is the Platform Block. There are two things that we need to develop beyond getting the sprite to be displayed; that is, we need to place it in the correct position and as Ember moves across the screen, we need to remove the blocks once they are off the screen. In Ember Quest, the player can only move forward, so this will keep the game lightweight as it’s an infinite level.
Open the lib/objects/platform_block.dart file and add the following code:
import 'package:flame/collisions.dart';
import 'package:flame/components.dart';

import '../ember_quest.dart';

class PlatformBlock extends SpriteComponent
    with HasGameRef<EmberQuestGame> {
  final Vector2 gridPosition;
  double xOffset;

  PlatformBlock({
    required this.gridPosition,
    required this.xOffset,
  }) : super(size: Vector2.all(64), anchor: Anchor.bottomLeft);

  @override
  Future<void> onLoad() async {
  }

  @override
  void update(double dt) {
    super.update(dt);
  }
}
We are going to extend the Flame SpriteComponent and we will need the HasGameRef mixin to access
our game class just like we did before. We are starting with the empty onLoad and update
methods and we will begin adding code to create the functionality that is necessary for the game.
The secret to any gaming engine is the game loop. This is an infinite loop that calls all the
objects in your game so you can provide updates. The update method is the hook into this and it
uses a double dt to pass to your method the amount of time in seconds since it was last
called. This dt variable then allows you to calculate how far your component needs to move
on-screen.
All components in our game will need to move at the same speed, so to do this, open
lib/ember_quest.dart, and let’s define a global variable called objectSpeed. At the top of your
class, add:
  late EmberPlayer _ember;
double objectSpeed = 0.0;
So to implement that movement, declare a variable at the top of your class and make your update
method look like this:
final Vector2 velocity = Vector2.zero();
  @override
  void update(double dt) {
    velocity.x = game.objectSpeed;
    position += velocity * dt;
    if (position.x < -size.x) removeFromParent();
    super.update(dt);
  }
All that is happening is we define a base velocity that is instantiated at 0 on both axes and then
we update velocity using the global objectSpeed variable for the x-axis. As this is our
platform block, it will only scroll left and right, so our y-axis in the velocity will always be 0
as do not want our blocks jumping.
Next, we update the position which is a special variable built into the Flame engine components.
By multiplying the velocity vector by the dt we can move our component to the required amount.
Finally, if x value of position is -size.x (this means off the left side of the screen by the
width of the image) then remove this platform block from the game entirely.
Now we just need to finish the onLoad method. So make your onLoad method look like this:
  @override
  Future<void> onLoad() async {
    final platformImage = game.images.fromCache('block.png');
    sprite = Sprite(platformImage);
    position = Vector2((_gridPosition.x * size.x) + _xOffset,
        game.size.y - (_gridPosition.y * size.y),
    );
    add(RectangleHitbox()..collisionType = CollisionType.passive);
  }
First, we retrieve the image from cache as we did before, and because this is a SpriteComponent
we can use the built-in sprite variable to assign the image to the component. Next, we need to
calculate its starting position. This is where all the magic happens, so let’s break this down.
Just like in the update method we will be setting the position variable to a Vector2. To
determine where it needs to be, we need to calculate the x and y positions. Focusing on the x
first, we can see that we are taking gridPosition.x times the width of the image and then we will
add that to the xOffset that we pass in. With the y-axis, we will take the height of the
game and we will subtract the gridPosition.y times the height of the image.
Lastly, as we want Ember to be able to interact with the platform, we will add a RectangleHitbox
with a passive CollisionType. Collisions will be explained more in a later chapter.
Display the Platform
In our loadGameSegments method from earlier, we will need to add the call to add our block. We
will need to define gridPosition and xOffset to be passed in. gridPostion will be a
Vector2 and xOffset is a double as that will be used to calculate the x-axis offset for
the block in a Vector2. So add the following to your loadGameSegments method:
case PlatformBlock:
    add(PlatformBlock(
      gridPosition: block.gridPosition,
      xOffset: xPositionOffset,
    ));
    break;
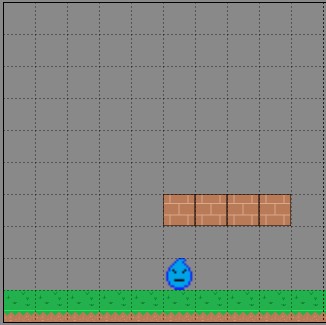
If you run your code, you should now see:
While this does run, the black just makes it look like Ember is in a dungeon. Let’s change that
background real quick so there is a nice blue sky. Just add the following code to
lib/ember_quest.dart:
import 'package:flutter/material.dart';

@override
Color backgroundColor() {
    return const Color.fromARGB(255, 173, 223, 247);
}
Excellent! Ember is now in front of a blue sky.
On to 4. Adding the Remaining Components, where we will add the rest of the components now that we have a basic understanding of what we are going to accomplish.